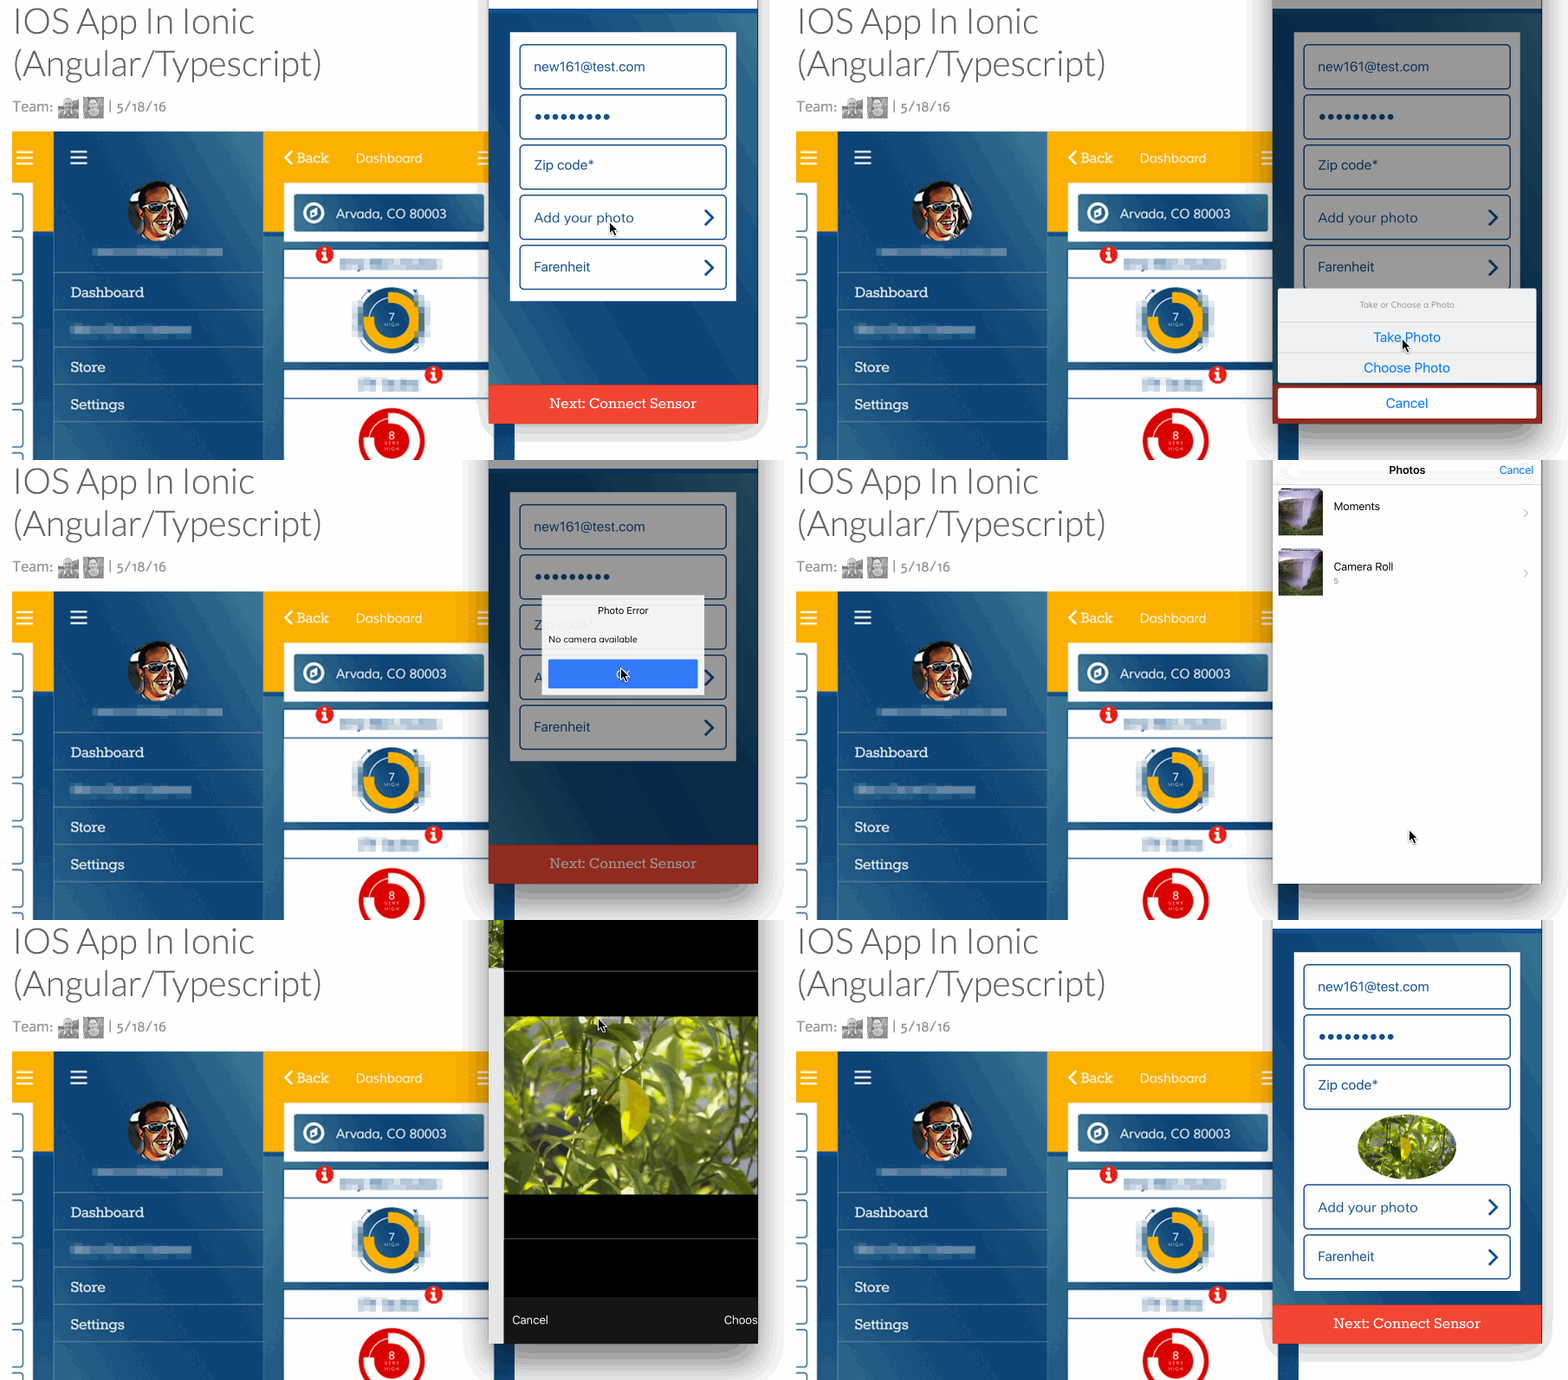
I recently finished an IOS app using the Ionic framework. I really enjoyed the experience. Ionic has tons of time saving features, and it is based on Apache Cordova, so you can use Cordova plugins to make apps that feel quite native.
My project comps required a button that would allow the user to choose a picture from their library or take a picture. As I searched the web for the easiest way to do this, most of the articles talked about using two plugins ( cordova-plugin-camera and cordova-imagePicker). This made me cringe. Wasn’t there a plugin powerful enough to do both? Not only that, but I got down the road a little bit and couldn’t get cordova-imagePicker to work on my project.
Hopefully this article will save you some time. 🙂
Some caveats:
- I’ve only tested this on IOS, but in theory it should work on Android too.
- I have the following dependencies in my package.json:
{
  "dependencies"   {
    "ionic": "^1.7.14",
    "cordova": "^6.1.1",
  }
}
Install Cordova Camera Plugin
You need to install the Cordova Camera Plugin (e.g. I’ve installed [email protected])
ionic plugin add [email protected]Using the Ionic CLI is important here (as opposed to the cordova CLI) because the ionic automatically adds the following line to your package.json
{
 "cordovaPlugins": [
  "[email protected]",
 ],
}
Make sure your package.json updates. An updated package.json file is helpful because then you can run `ionic state restore` and instantly have the same exact plugins as required by your code.
Install ngCordova
You can install inCordova with bower:
bower install ngCordova --saveThen include the new file in your index.html file:
<script src="lib/ngCordova/dist/ng-cordova.min.js"></script>Now you can inject it into Angular:
angular.module('myApp', ['ngCordova']);See the official ngCordova install directions here.
Start Using The Camera
Here is were the magic happens! Like I mentioned, other articles were saying that you needed both cordova-plugin-camera and cordova-imagePicker, but the latter isn’t necessary.
The most important part of what I’m going to show you is…
$cordovaCamera.getPicture(uploadPhotoOptions).then(takePictureSuccess,takePictureError);A full list of options (uploadPhotoOptions) can be found at the cordova camera plugin github repo.
The most important option for our purposes is…
uploadPhotoOptions.sourceType = Camera.PictureSourceType.CAMERA;
OR
uploadPhotoOptions.sourceType = Camera.PictureSourceType.PHOTOLIBRARY
It should be pretty self explanitory. Just call $cordovaCamera with the sourceType = Camera.PictureSourceType.PHOTOLIBRARY for photolibrary and Camera.PictureSourceType.CAMERA for camera.
One gotcha…
Camera.PictureSourceType.CAMERA only works on an actual device, unfortunately you can’t test in the Ionic emulator (i.e. `ionic run emulate`).
Full Code Example
I’ve included a full working sample below.
$ionicActionSheet.show({
 buttons: [
  { text: 'Take Photo' },
  { text: 'Choose Photo' },
 ],
 cancelText: 'Cancel',
 titleText: 'Take or Choose a Photo',
 buttonClicked: buttonClicked,
});
function buttonClicked(index){
 var uploadPhotoOptions = {
   quality: 50,
   destinationType: Camera.DestinationType.DATA_URL, //FILE_URI, NATIVE_URI, or DATA_URL. DATA_URL could produce memory issues.
   sourceType: Camera.PictureSourceType.PHOTOLIBRARY,
   encodingType: Camera.EncodingType.JPEG,
   allowEdit: true,
   targetWidth: 300,
   targetHeight: 300,
   saveToPhotoAlbum: false,
 };
 if (index == 0) { // Take photo
   uploadPhotoOptions.sourceType = Camera.PictureSourceType.CAMERA;
 } else if (index == 1) { //Choose Photo
   uploadPhotoOptions.sourceType = Camera.PictureSourceType.PHOTOLIBRARY;
 }
 $cordovaCamera.getPicture(uploadPhotoOptions).then(takePictureSuccess,takePictureError);
 function takePictureSuccess(success) {
   vm.userProfile.image = "data:image/jpeg;base64,"+success; //this is how I store the image to firebase
 };
 function takePictureError(error) {
   $ionicPopup.alert({
     title: 'Photo Error',
     template: error,
   });
 };
 return true;
}
I’m happy to answer any questions you may have, just post a comment below.


